


An overview of the Maple Leafs’ systems in each zone ahead of their first-round playoff series against the Washington Capitals.
Even Strength
Defensive Zone
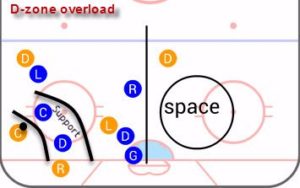
The Leafs‘ preferred defensive zone setup – like most teams – is an overload, focused on ‘zone’ rather than ‘man-on-man’ until there is a chance of a turnover. They break away from this structure a little early at times, which can be costly.
Overload structure cuts the ice in half, utilizing pressuring tactics to retrieve the puck and transition it out. The structure is similar to the image below with a strong side (where the puck and action is) and a weak side that contains less manpower (where there is a need to look over shoulders for the Caps invading “soft spots”).

Toronto works much better when the d-zone structure contains as little movement as possible, only engaging players at the edges close to the puck carrier with support layers. There are three layers: the engage layer (getting to the puck carrier), the support layer (behind the main engagement), and the goal line layer (the absolute last line of defense).
The support-structure layers in the defensive zone will be paramount to moving the puck out after a successful transition from defense. Crudely drawn, the layers should look like this, with a support layer directly behind the engaging defensive player.
Some of the Leafs blown leads include the opposition exploiting Toronto’s soft spots in coverage and slipping in undetected or unchecked. There is very little to tweak systematically here; it’s simply a matter of awareness in the defensive zone. The Capitals will stretch this capability to the fullest.
Washington’s forecheck is carried out mostly below the goal line. To beat through that initial attack, the support layers will be conduits to moving the puck out either with quick short passes or by skating it out through controlled exits and moving together as a unit, something the Leafs have been doing since Mike Babcock became head coach.
In addition, the Leafs will dump pucks out into the center ice area or go high off the glass (HOG play). The other preference for Toronto is to make stretch passes and stretch plays, bypassing forechecking pressure in their own zone and forcing the opposition to scurry back.
The video below is an example of the controlled breakout stretch play. Sometimes it involves a player in the neutral zone picking up the puck; other times, it’s a tip-in play that has the Leafs forwards already in high gear for a retrieval.
Neutral Zone
Controlling the neutral zone involves patrolling the defensive zone blueline and making it difficult to enter the Leafs zone with control. Limiting controlled zone entries is only half of the battle. Backside pressure and disruption in the neutral zone will force dump-ins, while puck retrievals to elude the Caps’ quickness and forechecking without drawing any unnecessary interference calls is determined in the center of the ice.
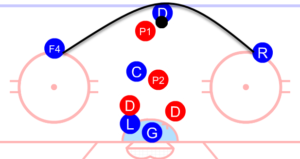
Limiting controlled exits from the opposition zone will be paramount, too. Toronto’s neutral zone setup is designed to create pressure using their high F3, setting up more like a triangle than a traditional 1-2-2.
The ‘L’ in this situation is the F3 that will provide a support layer for the forechecking pressure applied by the ‘C’ and ‘R’.
Most clubs will use a traditional boxy 1-2-2 with a forechecker spearheading the pressure, but empowering an F3 to apply pressure in this fashion can be stifling and more beneficial over a series than an artificial secondary line of defense with one lone forechecker. Toronto effectively uses a makeshift 2-1-2 by throwing two forwards deep into forechecking space along with a support layer. It’s a very aggressive tactic — and it’s effective.
Offensive Zone
Every team in the NHL uses a 2-1-2 of some sort to maximize forechecking pressure in an attempt to keep the puck deep in the zone. When the puck comes to the top of the zone, the defense is empowered to apply pressure and move the puck back down below the hash marks and take the spot of the forward down low. To do this effectively, they require another support object — this time in the form of a trailing forward (high forward or F3), who takes up the spot when a defenseman applies pressure. Crudely drawn, it looks something like this:
The concept is similar to ‘total hockey,’ where every player can freelance into temporary positions while adjustments are made on the ice to cover up any holes.
Four on Four
There is very little four-on-four play over a series, but this might be one of the areas where the Leafs can take advantage of the Caps. With one less player on the sheet, there’s an opportunity to manipulate gaps created by the Leafs skilled and speedy forward group. A skilled component in the offensive zone can be a nightmare for the Capitals’ in-zone defense.
Special Teams
Power Play
Before getting into the Leafs power play setup, make sure to check out Anthony Petrielli’s pre-scout of the Capitals power play.
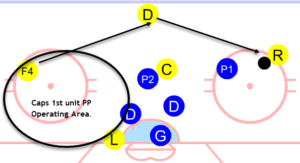
The Leafs power play appears to use a 1-3-1 but it’s more of an umbrella up top, with shooters positioned at the top of the faceoff circle rather than at the hashmarks of a typical 1-3-1. It fluidly adjusts further down depending on applied pressure.
The play is to move the puck to the goal line (‘L’ position) and open a lane for the ‘C’ to take a shot, and then drive the net. Nazem Kadri had great success running this play all season long, and I’d expect more of the same in the playoffs. Toronto has tried to implement a backdoor strategy recently, but I suspect that’s a secondary tactic.
Above is the in-zone setup, but before that happens, the Leafs need to gain entry into the zone. This is a problem area for Toronto, especially recently.
The Leafs use the drop pass to gain speed and enter the zone, sometimes using a double drop to add an additional layer. This commonly-adopted tactic has been fumbled and caused fits at the opposition blueline at times. Teams can effectively clog the line and let the chaos sort itself out.
Gaining the zone and making any lateral passes enabling the umbrella setup remains a problem area — that is universal to the NHL, not only Toronto. A puck carrier with speed getting in deep will make for successful zone entries. Breaking the blueline only to try to set up, I suspect, would have less success and create more transitionary risk than necessary.
Penalty Kill
The most efficient method of penalty killing is to limit the amount of time the power play has in their setup. Chaos is king. In the defensive zone, hard and aggressive pressure on pucks and puck carriers in order to disrupt positioning is a way of aggressively controlling the fate of the outcome, unlike static positioning and simply getting sticks into passing lanes (a passive tactic).
The Leafs attack the puck carrier with zeal, and when they don’t, they leave themselves vulnerable. Disrupting the power play setup is key.
Washington’s first unit is unique with a common effort to feed Alex Ovechkin the puck. The operating area is usually on the opposite side with puck movement along the arrows. This allows the focus to be away from Ovechkin and enables the pass across for the one-timer.
The second unit seems to control the play beneath the goal line, requiring a different PK set up, but the philosophy should remain the same: Attack the puck carrier and disrupt the setup.
Penalty killing will be a crucial element in this series.


